
If you are just starting out into designing your own pictures or even if you're like..up there at PRO Level.Everybody always wants to know how to BLENDD their pictures.
So that is what I will be doing today..=)
NOTE:: This tutorial is written for Paint Shop Pro
1) Make sure that the pictures you want to use have like the same background and stuff and are the same size.
2) Open up the pictures you want to use in PSP.
I have chosen to use two pics of thee sexy Chris Brown.


3) Open up a TRANSPARENT BACKGROUND.
File -> New
Make the transparent background almost the same size as your pictures.
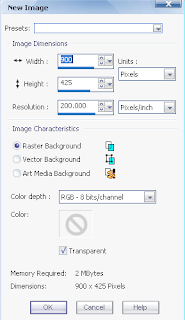
[[I'm using width of 900 and the height of 425]]
4) Go to each one of your pictures and COPY them and then go back to your transparent background and PASTE them as a NEW LAYER.

5) When both of your pictures are on the transparent background, you then want to take your PAN TOOL.
[[Which is the little hand icon..alllll the way at the top of your little tool section...thingy..]]
And with that tool, arrange your photos so that one of the photos is overlapping the OTHER photo..like so..

6) Click on the ERASER TOOL and erase some of the background at the part where the pictures over lap.

7) When you're done erasing what you want out of your picture, you then want to click on the CROP TOOL and crop out your picture.

And that is the final result!
You then can add brushes and text and all that good ishh.
But you know I had to make mine look all purdy and what not.





No comments:
Post a Comment